DL Framework » OpenXLA
2024-03-13 :: 7537 WordsOpenXLA
2022.10 Google又创建了一个新的OpenXLA项目,旨在将XLA从TF中解耦。
官网:
https://github.com/openxla/xla

XRT & PJRT
PJRT:Pretty much Just another RunTime
TF的代码中有如下两个文件夹:
tensorflow/compiler/xla/xrt
tensorflow/compiler/xla/pjrt
XRT & PJRT的作用是:为其他框架如Pytorch/JAX提供生成XLA IR,并执行的能力。
PJRT是XRT的升级版。
参考:
https://github.com/openxla/xla/blob/main/xla/pjrt/c/docs/pjrt_integration_guide.md
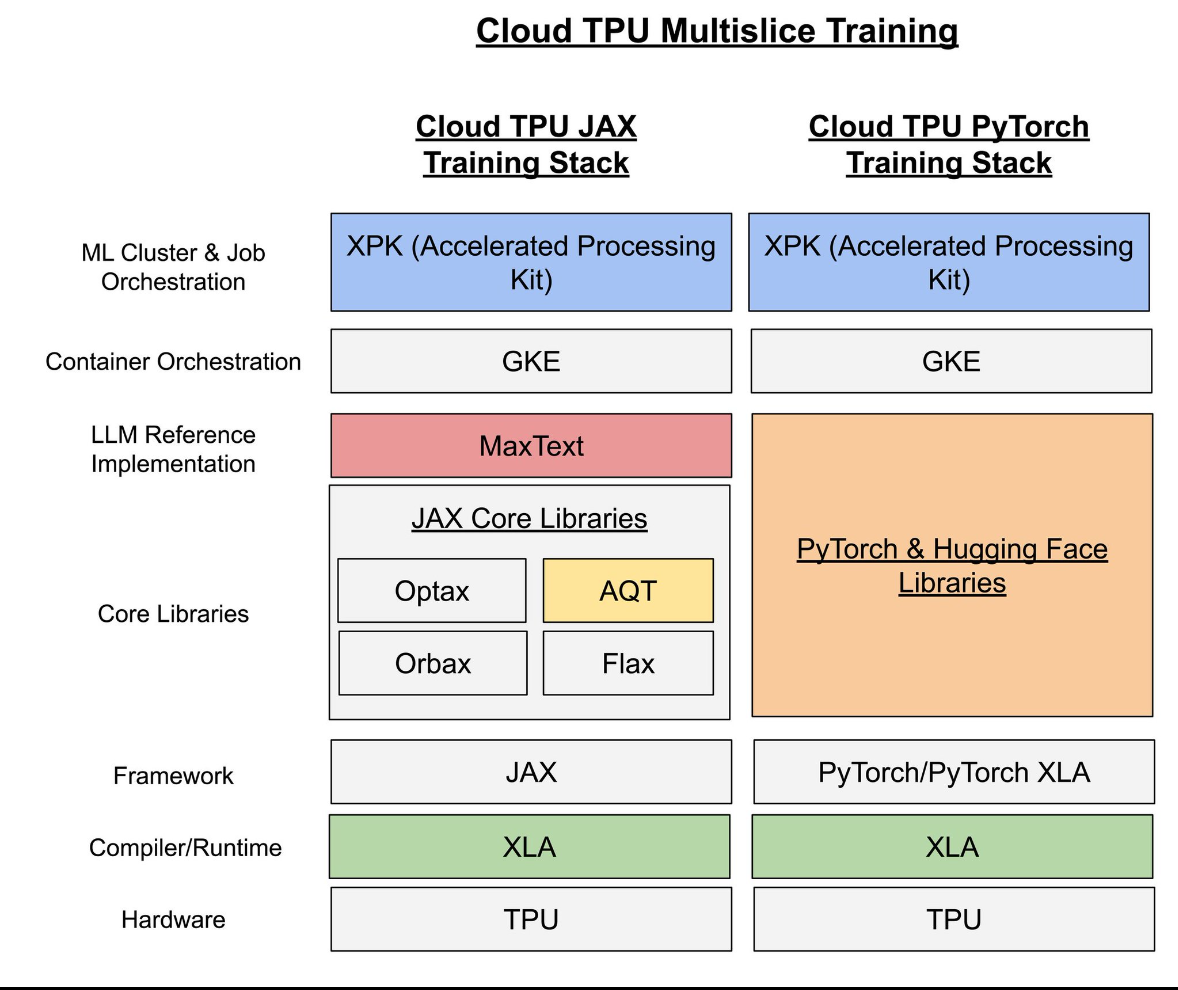
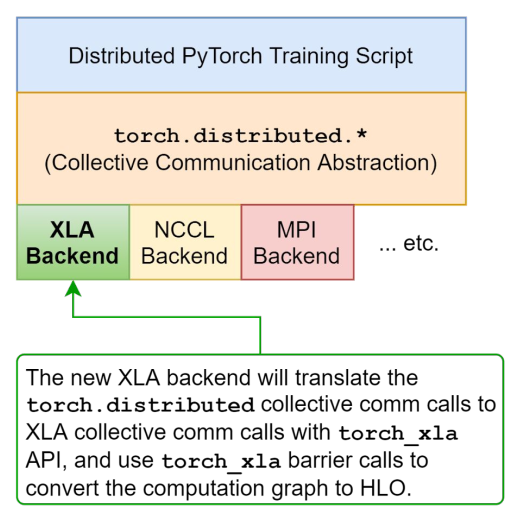
Pytorch XLA
Pytorch官方提供了如下项目支持XLA:
https://github.com/pytorch/xla
这个项目实际上是Google来维护的。
粗看了一下,都是些上层的代码,底层直接调用TF的实现。所以如果目标硬件已经接入TF XLA接口的话,理论上不需要修改就可以跑pytorch。

文档:
https://pytorch.org/xla/master/
PyTorch on XLA Devices
示例:
https://github.com/pytorch/xla/blob/master/test/test_train_mp_mnist.py
编译:
git clone --recursive https://github.com/pytorch/xla.git
cd xla

# modify bazel/dependencies.bzl to config pytorch:
# PYTORCH_LOCAL_DIR = "../pytorch"

# modify WORKSPACE to config openxla:
# by commenting out the http_archive above and uncommenting the following:
# local_repository(
#    name = "xla",
#    path = "/path/to/openxla",
# )

export XLA_CUDA=0
export BUNDLE_LIBTPU=0
python setup.py install

export PJRT_DEVICE=NPU
export NPU_LIBRARY_PATH=<work dir>/pytorch_xla/xla/build/temp.linux-x86_64-cpython-312/bazel-xla/bazel-out/k8-opt/bin/external/xla/xla/pjrt/plugin/libnpu.so

python3 ./torch_xla_lenet.py
debug env:
export PT_XLA_DEBUG=1
export XLA_SAVE_TENSORS_FILE=123.txt
export XLA_SAVE_TENSORS_FMT=hlo
export XLA_HLO_DEBUG=1
export XLA_IR_DEBUG=1
打印IR的source_line的call stack:
const torch::lazy::MetaData& nmeta = node->metadata();
std::vector<SourceLocation> frame_info;
meta.frame_info = torch::lazy::GetPythonFramesFunction()();
GetPythonFrames
PyFrame_GetLineNumber
PyFrame_GetLineNumber是python语言的标准C API函数。可参见python手册的Frame Objects章节。
tensor/op被统一为XlaNode。所以整个graph的执行流程被分为两个阶段:
1)MakeNode阶段。建立input tensor和op,并缓存起来。
2)SyncTensorsGraph阶段。app对于model的output tensor的计算请求,会触发Make output node的动作,这时就会进入SyncTensorsGraph阶段。
这种lazy tensor模式,无需app显式调用compile&run的操作。但对于解读程序的StackTrace带来了极大的挑战,因为几乎所有的调用的起点都是at::_ops::to_dtype_layout::call这样的基础操作,然而后续的行为却差了十万八千里。
此外,两阶段对于同一个tensor/op都会进行XLA指令的build,最终执行以SyncTensorsGraph阶段的为准。两阶段的XLABuilder的name是不同的,后一阶段以SyncTensorsGraph作为名字的前缀。
XLATensor从LazyTensor中派生,然而LazyTensor并不是at::Tensor的派生,而是一个引用计数的对象,由于LazyTensor到at::Tensor的映射有些复杂,所以XLATensor使用Base()指向对应的at::Tensor。
Tensor相关的python到C++的接口需要实现VariableHooksInterface。
XLANode到HLO的变换由XlaBuilder负责,然而除了XLA::Shape之外的信息,几乎全部丢失。
Backend的参考实现:
Intel XPU:
https://github.com/intel/intel-extension-for-openxla
IREE:
https://github.com/openxla/openxla-pjrt-plugin
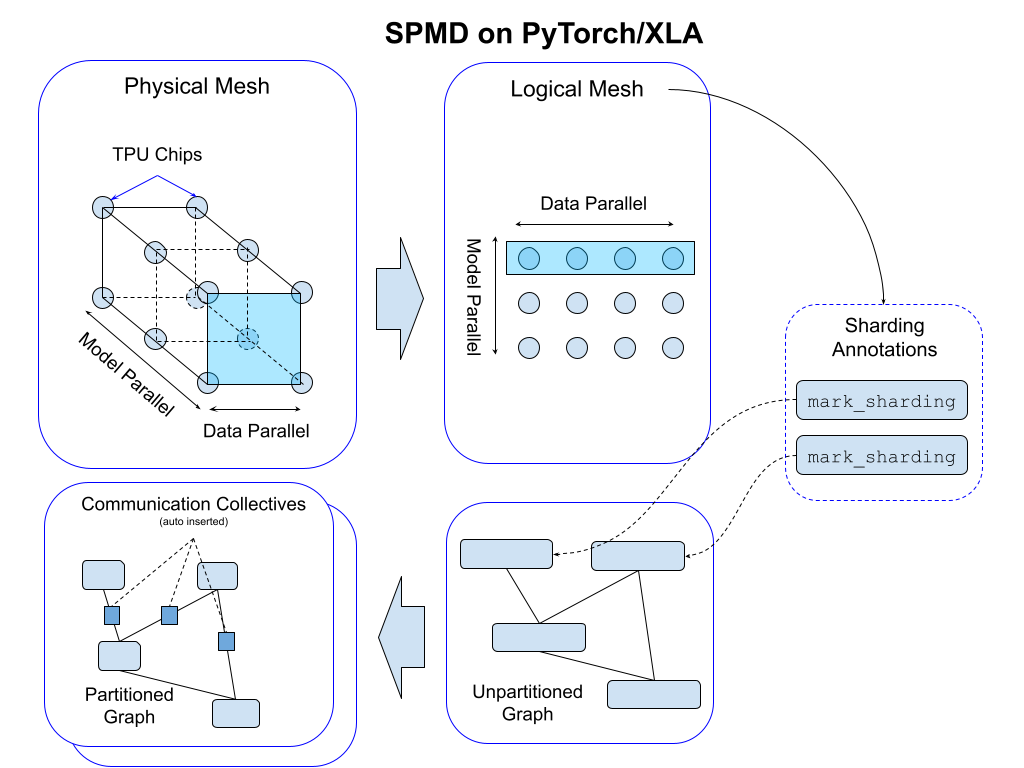
Mesh API:

https://pytorch.org/blog/pytorch-xla-spmd
PyTorch/XLA SPMD: Scale Up Model Training and Serving with Automatic Parallelization
https://www.openteams.com/large-scale-training-of-hugging-face-transformers-on-tpus-with-pytorch-xla-fsdp
Large Scale Training of Hugging Face Transformers on TPUs With PyTorch/XLA FSDP
有时候conda环境里使用的gcc版本,和本地的gcc版本有差异,会导致编译产生的py库,有一些问题:
https://blog.csdn.net/weixin_39379635/article/details/129159713
如何解决version `GLIBCXX_3.4.29‘ not found的问题
类似的,还有库找不到的问题,一般用LD_LIBRARY_PATH解决之。
https://blog.csdn.net/qq_40329272/article/details/111801695
undefined symbol:_ZN5torchXXXX
打印网络信息:
torch_xla/torch_xla/core/dynamo_bridge.py:
def extract_compiled_graph(xla_model: torch.fx.GraphModule, xla_args):
To print a tabular representation of the graph, use:
xla_model.graph.print_tabular()
To get a SVG visualization of the graph, use:
from torch.fx.passes.graph_drawer import FxGraphDrawer
drawer = FxGraphDrawer(xla_model, "model_name")
with open(f"svg/save/dir/{drawer._name}.svg", mode="wb") as f:
    f.write(drawer.get_dot_graph().create_svg())
custom op:
XlaDeviceType hw_type = static_cast<XlaDeviceType>(GetCurrentDevice().type());
if (hw_type == XlaDeviceType::TPU)
{
  resized =xla::CustomCall(...);
}
openxla/docs/custom_call.md
动态注册plugin:
torch_xla/experimental/plugins.py
    npu_plugin = NpuPlugin()
    xp.use_dynamic_plugins()
    xp.register_plugin("npu", npu_plugin)
    xr.set_device_type("npu")

    device_type = xr.device_type()
    assert device_type == "npu"
XLA_USE_32BIT_LONG
squash_64bit_types
xm.mark_step()用于分割之前和之后的torch语句所组建的计算图。
options的传递链:
// torch_xla
torch_xla::runtime::GetComputationClient()
client = std::make_unique<PjRtComputationClient>();
options.allowed_devices = allowed_devices;
client_ = std::move(xla::GetStreamExecutorGpuClient(options).value());

// openxla
GetGpuXlaClient(options.platform_name, options.allowed_devices)
LocalClientOptions options;
ClientLibrary::GetOrCreateLocalClient(options);
ServiceOptions service_options;
LocalService::NewService(service_options)
BackendOptions backend_options;
Backend::CreateBackend(backend_options)
PlatformUtil::GetStreamExecutors(platform, options.allowed_devices())
op的传递链:
at::_ops::linear::call
at::_ops::addmm::call
at::_ops::addmm::redispatch
torch_xla::XLANativeFunctions::addmm
mata_data:
XLATensor::SetNodeUserMetadata
hlo->set_metadata_op_name
XlaBuilder::SetOpMetadata/SetOneShotOpMetadata
参考:
https://pytorch.org/blog/pytorch-2.0-xla/
PyTorch 2.0 & XLA—The Latest Cutting Edge Features
https://huggingface.co/blog/pytorch-xla
Hugging Face on PyTorch / XLA TPUs: Faster and cheaper training
https://pytorch.org/tutorials/recipes/intel_extension_for_pytorch.html
INTEL EXTENSION FOR PYTORCH
https://pytorch.org/blog/path-achieve-low-inference-latency/
The Path to Achieve Ultra-Low Inference Latency With LLaMA 65B on PyTorch/XLA
Quantization
pytorch的Quantization主要使用PT2E(PyTorch 2 Export)接口。
demo:
torch_xla/test/stablehlo/test_pt2e_qdq.py
convert_pt2e有个参数叫做fold_quantize,目前为True的情况下,还有一些问题:
https://github.com/pytorch/xla/issues/6567
pytorch IR -> XLA IR -> stablehlo IR,其中的第二步存在一些问题。
XLA_STABLEHLO_COMPILE: 这个env用于打开stablehlo的编译。
  %custom-call.101 = f32[1,3,224,224]{3,2,1,0} custom-call(f32[1,3,224,224]{3,2,1,0} %p12.100), custom_call_target="stablehlo.uniform_quantize", api_version=API_VERSION_TYPED_FFI, backend_config={scale=[0.00391965],zero_point=[-128],storage_type=si8,expressed_type=f32,storage_min=-128,storage_max=127}
  %custom-call.102 = f32[1,3,224,224]{3,2,1,0} custom-call(f32[1,3,224,224]{3,2,1,0} %custom-call.101), custom_call_target="stablehlo.uniform_dequantize", api_version=API_VERSION_TYPED_FFI, backend_config={scale=[0.00391965],zero_point=[-128],storage_type=si8,expressed_type=f32,storage_min=-128,storage_max=127}
参考:
https://pytorch.org/tutorials/prototype/pt2e_quant_ptq.html
PyTorch 2 Export Post Training Quantization
https://pytorch.org/tutorials/prototype/pt2e_quantizer.html
How to Write a Quantizer for PyTorch 2 Export Quantization
Profile
C++层面:
使用tsl::profiler::TraceMe,与TF XLA一致。
python层面:
使用torch_xla.debug.profiler类。
demo:
torch_xla/test/pjrt/test_profiler.py
torch_xla/test/test_profile_mp_mnist.py
两个示例展示了两种不同的tracer用法。
FSDP for torch_xla
FSDP的基本概念,参见《并行 & 框架 & 优化(五)》。
分布式,包括FSDP的测试用例主要在:
- torch_xla/test/test_train_mp_mnist.py
- torch_xla/test/test_train_mp_mnist_zero1.py
- torch_xla/test/test_train_mp_mnist_fsdp_with_ckpt.py
min_num_params: FSDP默认自动包装的最小参数量。 cpu_offload: 是否将参数和梯度卸载到CPU。
XlaFullyShardedDataParallel
self._shard_parameters_(params_to_shard)
torch_xla._XLAC._replace_xla_tensor(p, p.new_zeros(1))
shard_data = self._get_shard(p)
_flatten_and_pad_to_world_size
self._fsdp_wrapped_module: nn.Module = XlaFlattenParamsWrapper
参考:
https://pytorch.org/blog/scaling-pytorch-models-on-cloud-tpus-with-fsdp/
Scaling PyTorch models on Cloud TPUs with FSDP
https://zhuanlan.zhihu.com/p/616858352
一些LLMs的省内存方法
FSDP的计算图会随时根据需要,创建/删除weight,如果不加特殊处理的话,后续优化环节的subexpression elimination (CSE) ,会将这些操作优化掉,所以XLA引入了OptimizationBarrier算子来阻止这个优化。

您的打赏,是对我的鼓励
